|
|
LaMina WoodStrip Canoe
|
|
|
From Birchbark to PlywoodThis spring I'm starting my canoe project. Living close to the Rockies, there is not too much water around, but still enough to make this project worthwhile. It's a good Canadian tradition to build your own canoe. Over the years, this has been done by many in birchbark, wood and canvas, fiber-glass and today's most popular cedar strip with epoxy.My plans are a bit different and I like to explain here why. I like the shape and looks of the classic planked canoes with ribs. Probably because they have more rhythm than the modern smooth hulled strip epoxy canoes. And although I like the color and pattern of wood, I also think there is nothing wrong with a canoe painted in a nice bright color. Further, when you visit one of today's wood selling stores, it's tough to find a straight piece of timber. Which is a development you can fight by going to expensive specialty stores, but isn't it much more interesting to see what you can make with what's regularly available? Didn't the Indians build their canoes too with locally available materials? So, what for them was birchbark and white cedar out of the forest will for me be plywood and glue from the local home improvement store.
The goal of my project is to build a canoe with a classic design, but using modern
easily available materials and the corresponding low costs. The name of the canoe I have
already decided on, it can only be "La Mina", applicable for a laminated plywood construction.
At the same time it's a little
|
|
|
Building the Strongback Any book on canoe building shows you quickly enough that a big part of the construction time is absorbed with building the form.
Unfortunately, I don't have friends with canoe moulds in their backyard ;-). So, time to go ahead.
Cutting full sheets of chipboard is a tough job on a small hobby tablesaw, but with some inventiveness, it can be done.
Any book on canoe building shows you quickly enough that a big part of the construction time is absorbed with building the form.
Unfortunately, I don't have friends with canoe moulds in their backyard ;-). So, time to go ahead.
Cutting full sheets of chipboard is a tough job on a small hobby tablesaw, but with some inventiveness, it can be done.
Extending the little saw with large "tables" before and after helps a lot to support the sheet you are cutting. With my sawing machine, extending it was not very difficult. And it makes all the difference in handling those huge sheets. This will become helpful, when I have to cut the 3 mm plywood into strips for the hull. The strongback I'm crafting is completely "out of the book", in this case Ted Moores' book "Canoecraft". Because I intend only to build a single canoe, I use a bit thinner, but also much cheaper chipboard for my strongback and moulds. After putting the three parts together, the result has really become strong. As it should be, being a strongback. It also fills up the garage quite a bit, so the car has to leave. But I knew that beforehand.
|
|
|
Making the Moulds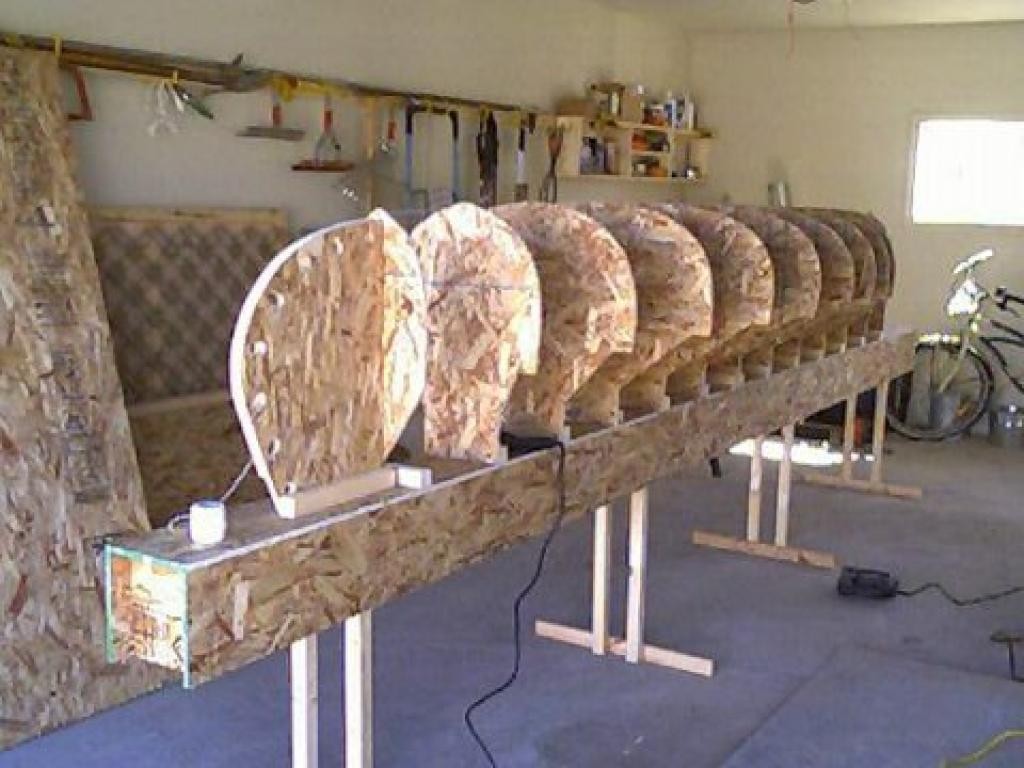 Starting with a good line-plan is IMHO an essential step to a successful project. In my case I bought the plan for a
"15' Bob Special"
from "Carrying Place, Canoe & Boat Works".
Using some sheets of carbon paper, the lines were transferred to the chipboard for the moulds.
Starting with a good line-plan is IMHO an essential step to a successful project. In my case I bought the plan for a
"15' Bob Special"
from "Carrying Place, Canoe & Boat Works".
Using some sheets of carbon paper, the lines were transferred to the chipboard for the moulds.
Lacking a proper bandsaw, I cut the moulds using my jigsaw. As said, one of the aims of this project is to use what is readily available. Spending more dollars on additional tools than on materials is definitely not part of the plan. After two half days of work, a nice stack of moulds is waiting to be mounted on the strongback. But first I want to laminate the inner and outer stems. The moulds for the stems are made twice as thick, by gluing on some cut-off pieces of chipboard. As usual with woodworking and especially with boat-building, you can not have enough C-clamps. As you see, I have many different types. Putting it all together, goes much faster than expected. Within a couple of hours, I suddenly can see the shape of the canoe to be. After adding a couple of battens the whole construction becomes very solid, ready for some final touches.
|
|
|
Laminating the Stems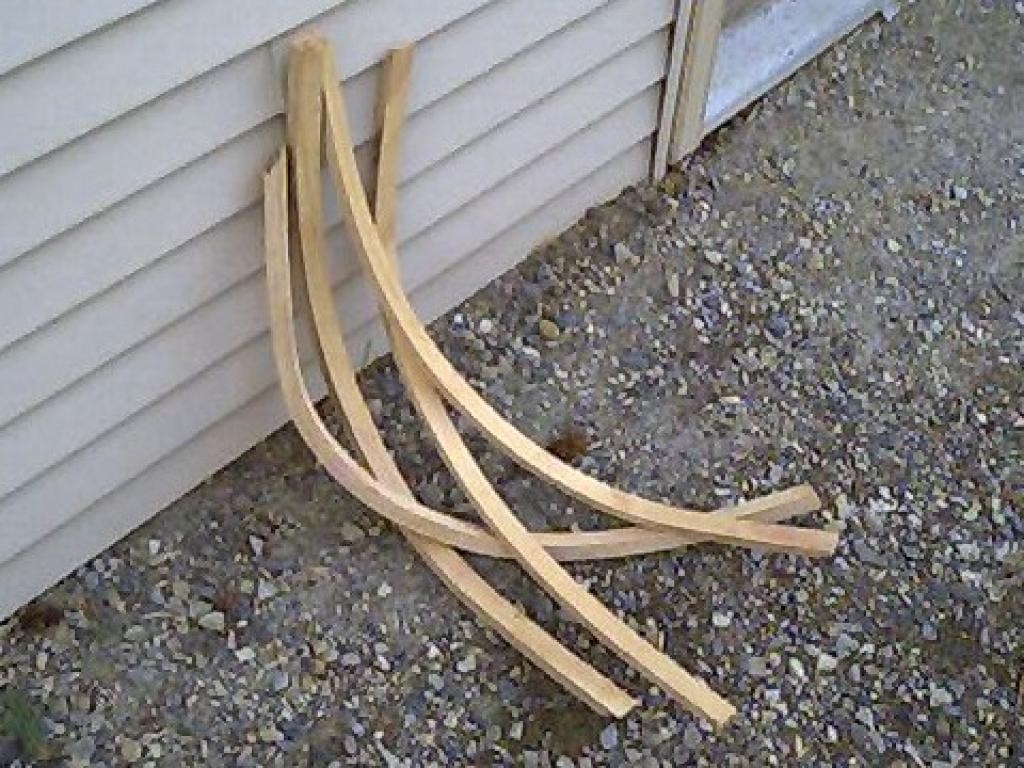 An exciting moment, my first attempt to do some real plywood laminating. In this case the inner and outer stems.
You need two for both ends of the canoe, but it is easiest to make them just double the width and later cut them in two.
Before doing the real gluing, I do a "dry-run" to see if it all fits and to check my C-clamps.
An exciting moment, my first attempt to do some real plywood laminating. In this case the inner and outer stems.
You need two for both ends of the canoe, but it is easiest to make them just double the width and later cut them in two.
Before doing the real gluing, I do a "dry-run" to see if it all fits and to check my C-clamps.
The glue I use is an urea-formaldehyde plastic resin. A white powder :-), to be mixed 2:1 with cold water, which gives a waterproof glue that can be worked on for four hours. That sounds good. So far, it looks that all went well. Besides the fact that I made more than double the amount of glue that I needed. Never mind, tomato cans enough ... After the glue has completely dried, it's time to cut the 5 cm wide laminates into two, which results in two 22 mm wide inner and outer stems. The wooden tool you see clamped to the table saw is called a "spring fingers". It's easy to make and it definitely helps you to save your own fingers. The end result is two inner and two outer stems. The laminated plywood is surprisingly sturdy, which is a good promise for the strength of the future canoe, but the downside will be that I won't have much flexibility in bending them to fit the mould. We'll see ... After clamping the inner stem to the mould, I can start the process of beveling them. The thickness must be reduced to 6 mm at the edge. Which is a time consuming job that I do with a spokeshave and when I get impatient with the beltsander. Laminated plywood appears to be a tough material.
|
|
|
Ripping the SheetsRipping the sheets of 3 mm plywood into strips 6 cm wide is not that difficult, as long as you extend the table saw with some extra surfaces.Calculating how many strips are needed, requires some high-school math :), but finally I settle for 80 strips. If I come short, it won't be difficult to cut a few more. The pile of plywood strips also gives the strongback a lower point of gravity which makes the whole setup more stable.
|
|
|
Woodstrips on the Hull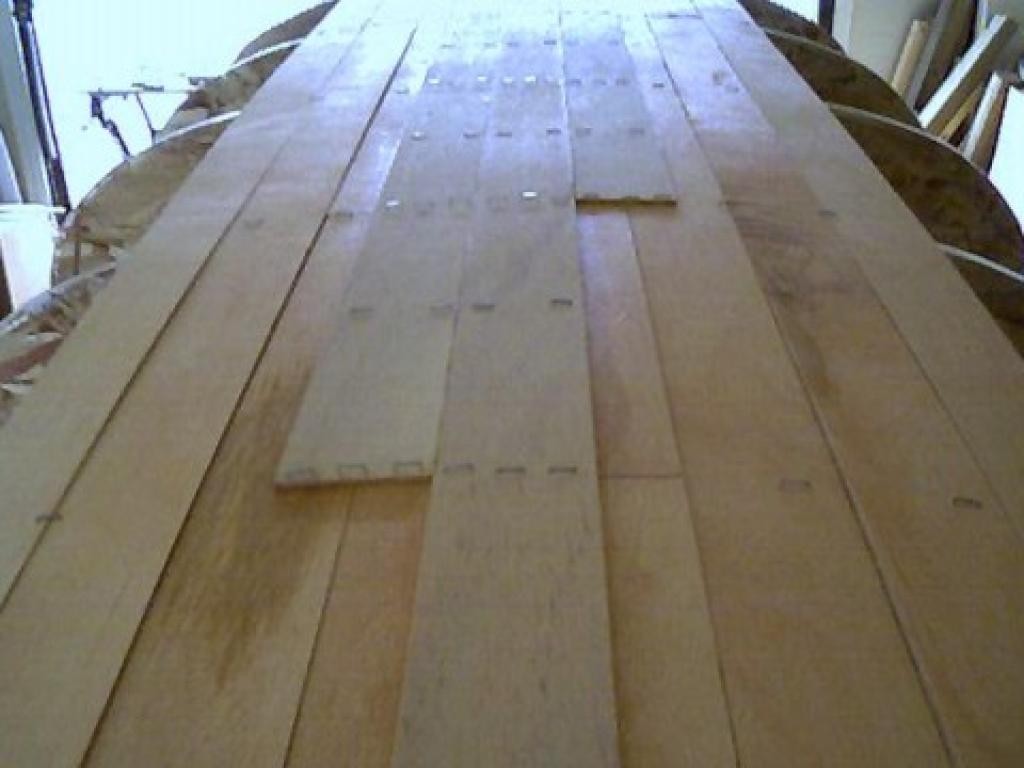 The first planks finally on the mould. This is the moment I've been waiting for.
Mostly because I wasn't sure if the strips would bend sufficiently.
If not, the whole project would have failed.
The nice thing about the thin plywood is that it is very east to cut or model.
I normally cut it with only a Stanley-knife or when at a strange angle, with a small saw.
In both cases, it is an easy job.
The first planks finally on the mould. This is the moment I've been waiting for.
Mostly because I wasn't sure if the strips would bend sufficiently.
If not, the whole project would have failed.
The nice thing about the thin plywood is that it is very east to cut or model.
I normally cut it with only a Stanley-knife or when at a strange angle, with a small saw.
In both cases, it is an easy job.
As said before, you can never have enough C-clamps. However, this type of fast-grip clamps is very useful, because the gripping surfaces can make an angle. And on a boat you always have some of that. Here is part of the skin, which consists of two layers of plywood bonded together with plastic resin glue. Lots of staples are required to keep the strips in place. But before the project ends, all staples will be taken out. After a good weekend of work, there is some pretty good progress. The parts where the hull is two layers thick feel really solid. On the other hand, the tight bends of the plywood at the stems remain to be a problem. It looks that I need something stronger than just staples to bend the strips. We'll see.
|
|
|
Gluing and Stapling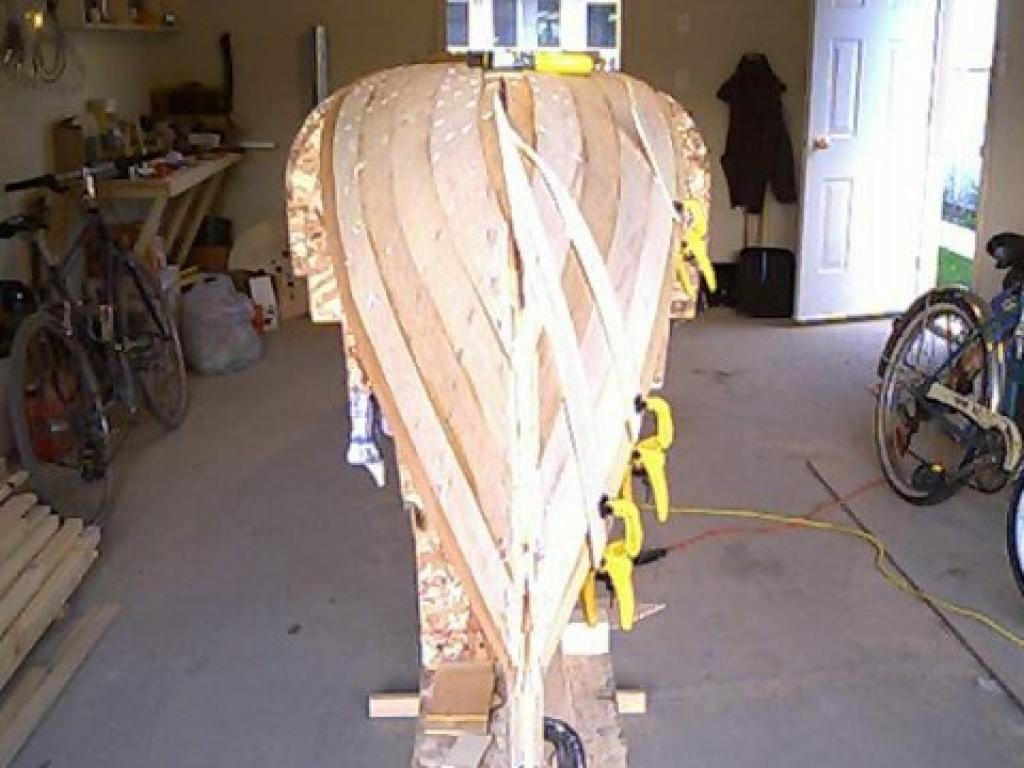 Last few weeks I've been progressing steadily, but planking the hull is a lot of work.
Cutting the plywood strips to length, mixing the plastic resin glue, brushing it to both sides and then the toughest part of all: bending and fixing it.
For the latter you need everything you can find; staples, clamps, strips of wood with glue, etc. etc.
Last few weeks I've been progressing steadily, but planking the hull is a lot of work.
Cutting the plywood strips to length, mixing the plastic resin glue, brushing it to both sides and then the toughest part of all: bending and fixing it.
For the latter you need everything you can find; staples, clamps, strips of wood with glue, etc. etc.
But, bit by bit, I'm getting there and the shape of the canoe is becoming more and more clear. At the stems, I'm now starting to approach the sheerline. Two more strips to go. In the middle, of course, I still need to do a few more. Because my plywood strips are quite wide, I use the same planking pattern as used to build the traditional canvas canoes. This means starting at the keel, and slowly working outwards. This pattern seems to work out rather well. The planks stay close together, even when bending them can be tough. The staples need to be hammered in deep enough to fix the plywood, but on the other hand must be left out enough for easy removal. A trick I've developed is to drive in only one side of the staple. It gives a tight fix, but you can still get your screwdriver under it. The planking works out particularly nice on the inside. The holes and marks left by the staples will later be covered by the ribs, which hopefully will give the canoe a nice classic interior. This is important, because I intend to varnish the inside, while painting the outside.
|
|
|
Time for TaperingThere comes a time when luck runs out. In this case, I couldn't continue with using full width planks. The curves became just too much and the plywood wouldn't bend enough anymore. So it was time to start tapering the planks. I did the first one using a Stanley knife. That works, but it takes way too much time.After considering many alternatives, a borrowed routing machine came to the rescue. An ingenious template construction took care of making twelve identically curved strips of plywood. The only thing I'm not sure about is if the neighbours can stand the whining noise the whole day long :-).
|
|
|
A sad, sad stop ...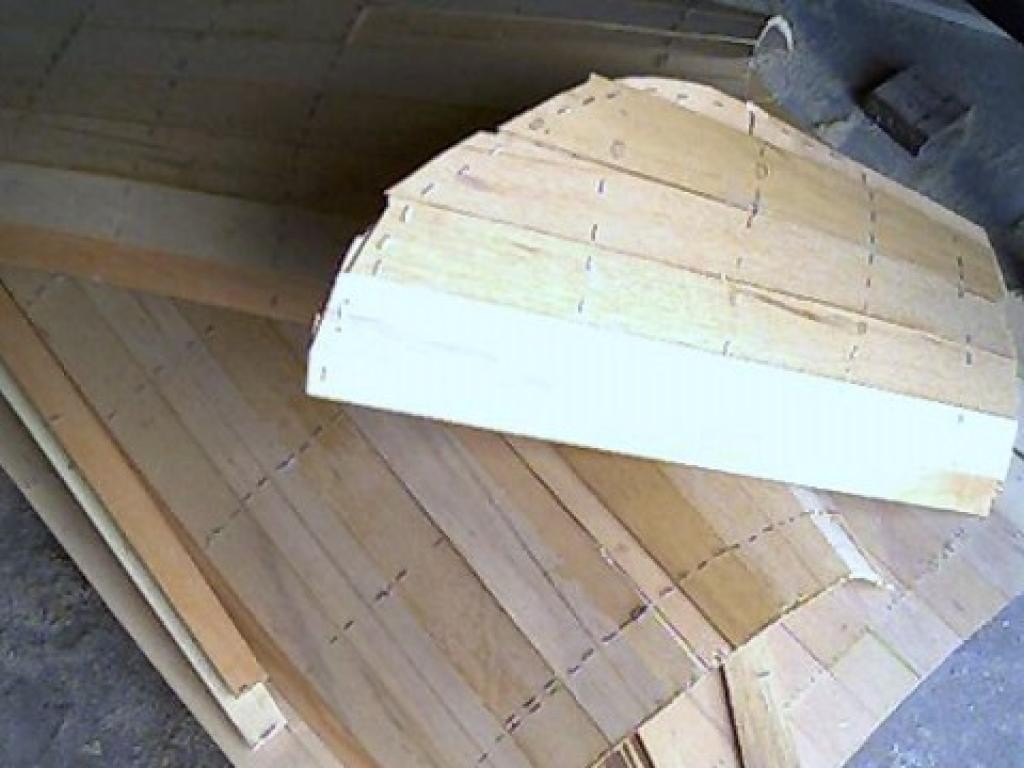 With all the tapering and because bending the strips really became difficult, the project slowed down to a crawl.
Winter is coming and the car needs to go back into the garage.
Only one solution, putting the saw into the canoe.
Which is a sad, sad moment, but that's how it is.
With all the tapering and because bending the strips really became difficult, the project slowed down to a crawl.
Winter is coming and the car needs to go back into the garage.
Only one solution, putting the saw into the canoe.
Which is a sad, sad moment, but that's how it is.
The good news is that I keep the strong-back and moulds. Therefore, next year or the year after, I can give this puzzle a fresh approach. And the nice thing of using cheap materials is that there was hardly any money wasted. Plywood, glue and some staples, that's all. Stay tuned ...
|
|
|
|